

Dormers with a roof slope of less than 9,5 degrees on a shingles roof
Dormers with a roof slope of less than 9,5 degrees on a shingles roof
If you want to get more space and light into your house, then you can build up a dormer on your roof or add a winter garden to the outer wall of your house. Dormers avoid the potential valleys that will be created. Usually these solutions have very low sloped roofs. Sometimes these slopes are even less than 9,5 degrees, making them not suitable for standard roofing materials. Roof parts such as valleys, very flat curved parts or low slope inclinations might all be dangerous spots for driven rain and water, snow accumulation and ponding water.
To have all of these details 100% secure, IKO launched a unique solution: the installation of the “Thermo-adhesive system” in combination with IKO bitumen shingles (nailing not required).
In this blog post you will find out how to install IKO Shingles on dormers with a low roof slope.
Shed dormer with a low sloped roof >>>

Basic types of dormers


Your IKO solution for low slope dormers = IKO Shingles Thermo System
Roof Shingles can be installed on any shape of roofs with a minimum roof slope of 15°
(with Cambridge Xtreme 9,5° you can go to a minimum 9,5°).
What if you have a roof part or dormer which has a very low roof slope between 4° to 15°?
Does it mean you have to use a different roof material instead of shingles for that part of the roof?
Does it mean you need to choose 2 different roof materials for your house?
Absolutely not!!
With IKO Shingles Thermo System you overcome the technical challenges of the low slope dormer and
finish your dormer also with professional IKO Shingles.
Your complete roof covered with 1 esthetical solution and you can choose any favorite shingle from the complete professional IKO Shingles range.
Beneath, we will focus on low sloped wooden deck application with regards to dormers.
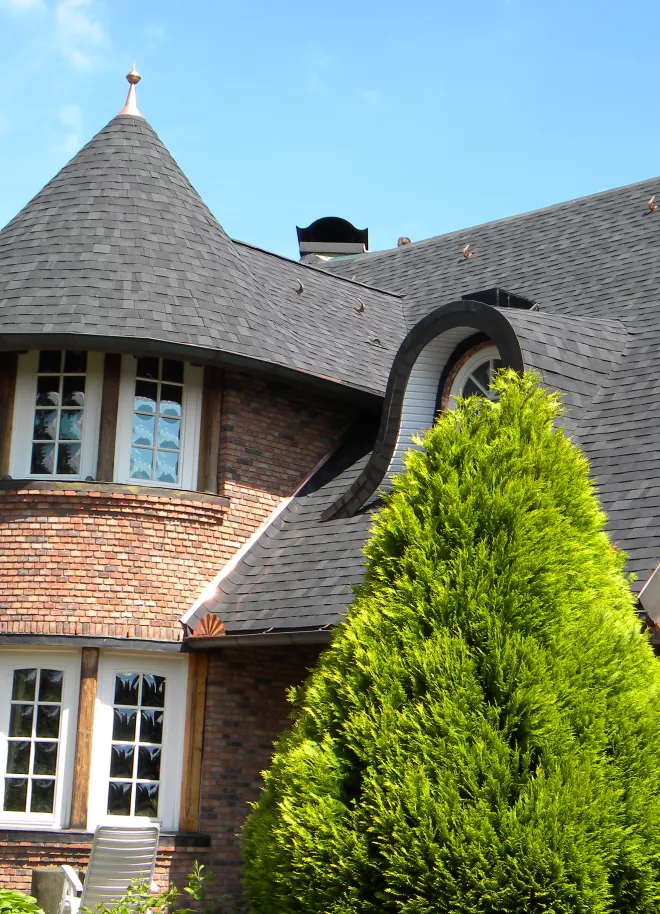
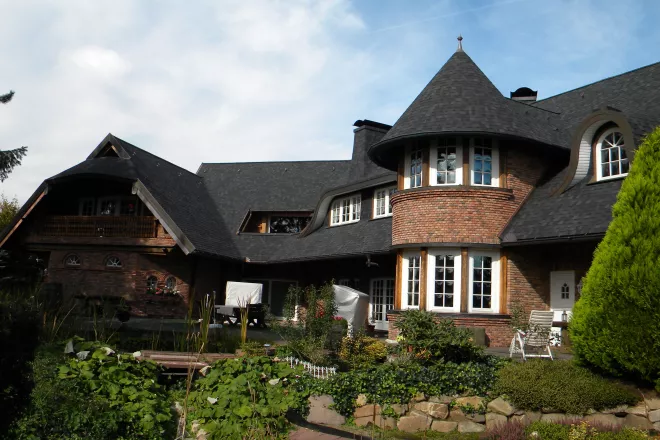
Reference project in Germany: IKO Cambridge Xpress, color 52 Dual Black
How to apply shingles on low slope dormers?

Red roof parts = low slope dormer parts
(before IKO Thermo System installation)


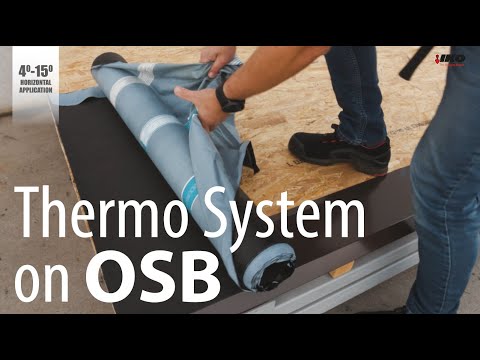
Wooden deck from OSB boards with tongue and grove joints:
It is very import to have a wooden deck that is extremely flat and dry.
The best way to achieve this flatness is to use OSB boards with tongue and grove joints. Under certain conditions, dry wooden planks can also be used but they must always be covered with thin OSB boards (6-8 mm).
With the low lumber moisture and tongue-groove edges we will eliminate movement of the structure to a minimum. The total recommended thickness of a wooden deck is 22 mm but always check the local building code.

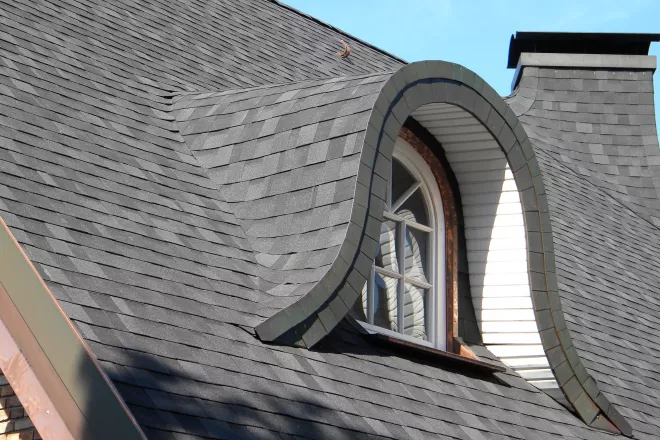
Rounded arch dormer and installation steps for underlayment and roof shingles
Finished rounded arch dormer with IKO Cambridge Xtreme color 55 Riviera Red


Metal flashings is important:
If you have a simple shed roof with rakes on the sides, then start with the drip-edge metal flashing at the eave first.
To protect the sides on curved dormers, eyebrow dormers or arched dormers, special custom bended metal flashings should be used on these edges. Metal flashings must be nailed to the wooden deck. If flashings have a water stopper, fix them with metal clips and don’t penetrate these flashings with nails.

Shingles are applied by torch-on method without nails:
Many special dormers, covered terraces or winter gardens which are connected to the main house have such a low slope that shingles cannot be applied with standard application methods. Usually these slopes are somewhere between 4°- 9,5° degrees.
With the new IKO Shingles Thermo System all types of IKO shingles can be applied over these special low roof parts. The shingles are applied by torch-on method without nails. It means that the roofing layer is not penetrated with holes by roofing nails and that the surface is 100% waterproof. Let’s go over the installation of this Thermo System step by step.

Install the Armourbase Thermo AD horizontally:
Then continue with the Armourbase Thermo AD membrane and the horizontal application on slopes between 4°- 9,5° degrees.
Armourbase Thermo AD is a thermo-adhesive and heat activated waterproofing membrane. On the back side of each roll is a release foil which must be peeled off during the application. To work more efficiently, it’s helpful if two people are involved during the installation. It is not necessary to fix this membrane on overlaps as we did for steeper concrete decks (slope > 15°), because the slope is less than 9,5°.
Horizontal and vertical overlaps of AB Thermo AD membrane:
The adhesion of the underlayment will start partly by the sun, but later-on during the installation of shingles by torch the adhesion will become adequately enough. Horizontal overlaps on Armourbase Thermo AD membrane are 10 cm, but end laps must be 15 cm. When the selvedge foil on top of membrane is removed, all overlaps must be pressed with a suitable roller.

Application of shingles on top of the membrane:
All types of IKO shingles can be used and combined with this method. Start with the precutting of shingles for diagonal application and prepare the starter strip as well. It always helps if you prepare a few shingles before. Get the torch with propane ready and follow all safety rules and regulations when working with an open flame. Very important is to flame only the membrane and not the surface of shingles.
Shingles have to be laid to the melted layer of modified bitumen when the polypropylene mat fabric disappears after torching. The core of the membrane contains polyester which means the underlayment is very durable. At the same time the underlayment is also very flexible because of the modified polymers in the bitumen. Wind-seal dots or self-adhesive parts on shingles will be activated and sealed by the heat of the sun.
Remember: do not make joints and connections between the shingles close to the valley or to any details where a lot of water accumulates! When the shingles are not glued properly on the surface of Armourbase Thermo AD, you can always lift this shingle and flame the membrane again. The membrane is 2,5 mm thick and the head-lap of the shingles will then stick adequately.

Some installation tips for low slope and curved dormers:
- Always use a self-adhesive Armourbase Stick or Armourbase Pro Plus underlayment for parts with slopes from 9,5° to 20°
- For the vertical dormer wall it is very handy to use these underlayments as well
- Use only the necessary amount of nails to fix an underlayment on flatter parts of dormers
- For slopes between 4° - 9,5° use Armourbase Thermo AD and install shingles without the nails
- With every valley on the dormer or slope inclination where Closed-Cut method should be applied, follow the rule of overlapping the shingles from the lower slope to the higher slope
- With IKO Thermo System and torch-on installation apply shingles up to 15° maximum, because from 15° you can use the standard nailing method
- Don’t forget to use Shingle Stick for all roof details, roof penetrations and especially for metal flashings
Resume on dormers
Many people invest in dormer roofs as they can transform dark, stuffy loft spaces into bright and spacious living areas. Although dormer roofs require major alterations to a roof structure, the payoff is definitely worth the effort.
And your complete roof is covered with 1 single esthetical solution: You can choose any favorite shingle from the complete professional IKO Shingles range.


