Search
Search
1438 results were found.
Insufficient ventilation
Your new roof might fail immediately if it doesn’t have proper ventilation. By having balanced intake and exhaust openings on your attic space you keep your roof healthy and you make sure it is never too cold or too warm. Furthermore, installing some healthy attic ventilation will prevent your roof from forming annoying ice dams after heavy snowfall. But also during the summer season installing proper ventilation keeps your roof in good condition. It helps avoiding a build up of the heat and moisture in your attic space. So make sure your roofer addresses ventilation in your home and inspects the attic space!


So even if you have the most flawless, strongest roof shingle the roofing job still needs to be handled with care. If the job is not done correctly, your roof can fail. A properly installed roof takes time and money. It’s a big investment in your home and family, but it is an investment that has to be made. Therefore choosing a trained roofer or contractor is a very important thing.
Tip: Understanding the reasons why a new roof can fail will help you hire a skilled and reliable roofer who will leave you confident in the durability of your new roof!


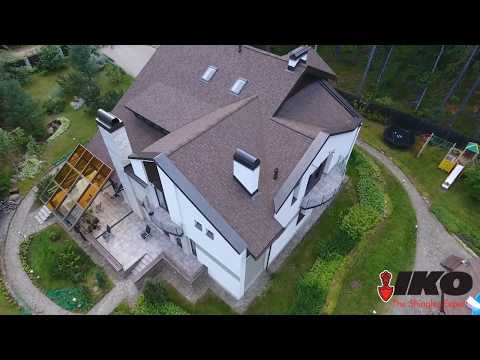
Let’s cut to the chase: Cambridge Xtreme 9.5° looks great on your roof!
Check for yourself in the following shingle drone video.
Cambridge Xtreme 9.5° is the best choice when it comes to a perfect architectural shingles roof. This extreme roof shingle has it all: an exclusive architectural look and feel, an impressive minimum slope, a wide range of roof shapes, extreme safety for your house,..
Cambridge Xtreme 9.5° is the ideal roof solution for many projects. Whether you are planning to build a “simple” (residential) house or a more distinguished architectural building project like a modern mall or an exclusive hotel, this roof shingle serves each purpose.
Xtreme roof slope = 9,5° (!) right up to 90°
Until a while ago, roof shingles have only been recommended for roof slopes between a minimum of 15° and a maximum of 85°. Cambridge Xtreme 9.5° easily exceeds this minimum roof slope by more than an impressive 35%! Unlike other roofing materials, often limited to a minimum slope of 15°, Cambridge Xtreme 9.5° can be installed on roofs of 9,5° (!). As for the maximum slope, this top of the range self-adhesive shingle can even be applied on vertical walls! So Cambridge Xtreme 9.5° opens up a whole new universe of possibilities on sloped roofs: from as low as 9,5° (!) right up to 90°. No more limits for your architectural building projects!

Suitable for all roof shapes
This wide reach of roof slope also means that a lot of different roof shapes can be covered with Cambridge Xtreme 9.5°: from a simple gable roof to a classy mansard roof, from a garmel roof to a curved turret, from a dormer roof to a façade. Thanks to its maximum slope of 90°, you can even cover a wall with Cambridge Xtreme 9.5°, resulting in a unique style for your contemporary building project.

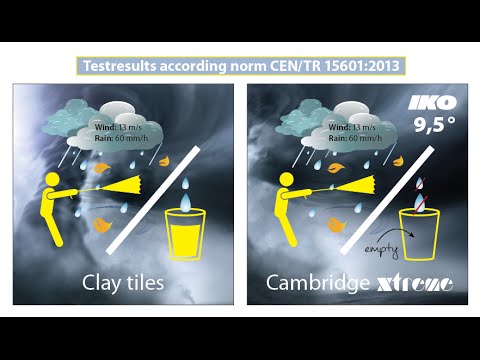
Impressive resistance to wind driven rain
Thanks to its self - adhesive character, this strong and durable shingle withstands the most severe wind driven rain. Cambridge Xtreme 9.5° was tested by the KIWA-BDA Institute Netherlands and exceeds the CEN/TR 15601:2012 norm. This norm stipulates a resistance to wind blowing at 47 km/h and rain falling with 89 mm/h. This is an extreme situation that occurs only once per 50 years in Europe (according to the BRE Institute). Cambridge Xtreme 9.5° even registered a perfect resistance to winds blowing at 61 km/h and rain falling with 120 mm/h. Safe to say that Cambridge Xtreme is the safe roofing choice when it comes to extreme weather situations.